

Picture slideshows are a pretty awesome end of the year gift for any student. I enjoy taking pictures of my kids and our activities throughout the school year so its nice to be able to use those photos for a sweet sentimental gift that will help your students remember their time in your class. As you're watching pictures of your kids with music playing in the background you start to forget all the stressful days, paperwork, after school meetings, and realize how lucky you are to have been a teacher in the lives of those kids. Every year I make one slideshow DVD for our kindergarten grade level that includes pictures from all of our kindergarten classes, as well as a slideshow of pictures from just my classroom. This is one of my kids' end of the year gifts so everyone gets one!
Parents love slideshows too! After our kindergarten year end awards program we invite all of the families back to our rooms. I play our classroom DVD for my kids and their families. When the slideshow is finished, there are only a couple of dry eyes in the entire room and those are usually the dads who are trying to act tough. I've even had countless parents tell me that their child spent all summer watching our classroom DVD over and over again. And I have to admit that I also spend some time during the summer watching slideshows from previous years.

This will be the sixth year that I have made 2 slideshow DVDs per year, so I've got this slideshow thing down to a science... Not really... But I did realize last year, that I had been following the same steps or process each year without even realizing it.
Disclaimer - Now this is by no means the only way to make a slideshow DVD. I'm sure there are plenty of tech savvy people out there who could show you way cooler things to do with iMovie than I ever could. I just thought it would be nice to write down my process, step by step, with a lot of pictures of course, because I am a visual learner, to share with the teachers at my school or anyone who wants to learn how to make a slideshow.
I decided to break this tutorial down into parts. Otherwise it would be a ridiculously long blog post! If you already know how to do some of these steps, just skip down to the ones you want. I will be adding links to each part after the entire series is finished.
So here is the breakdown:
Part One - Getting Everything
Part Two - Adding Pictures to iMovie
Part Three - Adding Text & Transitions
Part Four - Adding Music & Finalizing your Slideshow
Part Five - Exporting iMovie and Creating the iDVD Menu
Part Six - Burning DVDs and Putting on the Finishing Touches
Let's get it started!
Part One - Getting Everything Ready

Step 1 - iPhoto
Throughout the year I upload all my classroom photos to one album in iPhoto. Its easier to get a good look at each photo once uploaded to iPhoto because you can adjust the size of the photos. This is when I get rid of my blurry photos or ones that I just don't want in my slideshow. If you haven't been uploading your photos to iPhoto all year, that's okay, you can do it now.

Then you can start clicking and dragging all the photos you want to use into the album.
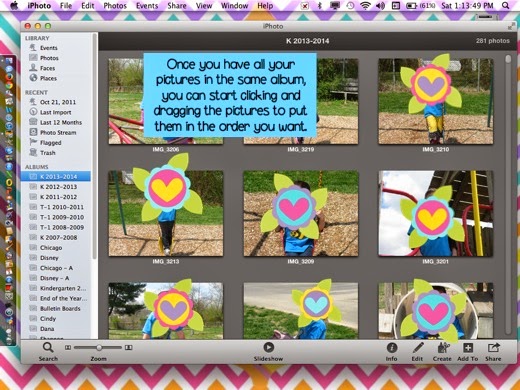 I like to move my photos around in iPhoto rather than waiting until I upload everything to iMovie.
Just my own personal preference because I can see the pictures in iPhoto so much better than in iMovie, where they are teeny tiny.
Miss Kriss's Tip (definitely not something you have to do) - I like to take a picture of each individual student and put these at the beginning of my classroom slideshow. Then later in iMovie I add each child's name to the bottom of their picture. I think this adds a special touch because it showcases each individual child. I let my students choose their favorite spot on our playground for their individual pictures. After these individual photos I go right into our classroom pictures. Mine are in chronological order, because I'm a little bit OCD, but yours can be in any order you like.
Once I get all my pictures where I want them its time for the next step.
Step 2 - iTunes

Then it's time to start hunting for some good sentimental music. If you already have some and know how to put it into your new album, skip on down.
For everyone else, you'll either need to purchase music from the iTunes Store or import music from your CDs before moving on.

I like to use more popular mainstream music as well as classics. But other teachers I know like to use classroom favorites like Dr. Jean or Jack Hartman. Your choice!

Just insert the CD. A box will pop up asking you if you want to import the CD. Click yes and the import will begin.


This picture shows what your screen will look like when you are importing a CD.

Just click on the iTunes Store tab on the left, type the name of a song you want to search for in the top right box, and there you go.
Miss Kriss's Tip - Each year I look for new songs to use in my slideshow. I make 2 different slideshows every year and don't like to use the same songs in both. Nor do I like to use all the same songs for consecutive years. To find some good choices you can Google "end of year songs" or "slideshow songs." I also like to rotate between slow songs and upbeat songs.
Here are some of my past favorites:
- Stand by Me - Ben E. King
- ABC - Jackson Five
- You've Got a Friend - Randy Newman - Toy Story soundtrack
- World's Greatest - R. Kelly
- You'll Be in My Heart - Phil Collins - Tarzan soundtrack
- Unwritten - Natasha Bedingfield
- Forever Young - Rod Stewart
- Count on Me - Bruno Mars
- Breakaway - Kelly Clarkson
- My Wish - Rascal Flatts
- The Time of Your Life - Randy Newman - A Bug's Life soundtrack
- On My Way - Phil Collins - Brother Bear soundtrack
- Over the Rainbow - Israel Kamakawiwo'ole (hope I spelled that right) --- I love to use this song for the menu screen on my DVD (you know, when you put the DVD in the DVD player and the menu screen pops up for you to press play. This is the music that plays then. )

I hope you enjoyed Part One of my How to make an iMovie tutorial.
Coming up next will be Part Two - Adding Pictures to iMovie.
No comments:
Post a Comment