
I love finding great ideas on Pinterest. But what's even better is actually taking the time to do those projects I've pinned. Today I have 2 Pinterest success stories!
The first Pinterest inspired craft were these super cute crayon clothespins.
This is the original pin. There was not link from the picture. So I just went off of what I saw.

I thought these crayon clothespins would be super cute to display my students' work in the hallway on my already existing clothesline.
So first I bought 2 boxes of crayons. I love Crayola!

Then I had to figure out how to get the paper off the crayons without tearing it. This was a little more complicated. So when in doubt...Google it.
One suggestion said to use a razor blade, so that's what I did.

It took me a little trial and error to get it right, but finally I got it going. The glue they use to keep the paper on the crayon is super strong. When I was finished getting all the wrappers off, I noticed that the papers were still very much curled and would therefore be difficult to mod podge. So they spent the night under a heavy book to help flatten them out. Thanks Harry Potter!

Next, I trimmed each wrapper down to fit the width of my clips. Then I used a sponge brush to spread some mod podge onto the clothespins and then placed the crayon wrapper on top. I held the crayon wrapper down on each clothespin for a few seconds because some were still trying to curl.
By the time I finished the last clip, the first were already dry enough for their top coat. So I went down the row again and spread mod podge onto the top and sides of each clothespin. I let them dry overnight.

I absolutely love how these turned out! You can't tell from my picture, do to my sub-par photography skills, but the colors are very bright and pretty. The only thing that bothers me about the finished product is that my clothespins were longer than the crayon wrappers. Obviously I can't make the wrappers longer, but I bought these clothespins at Hobby Lobby and noticed they were a bit longer and skinnier than ones from Walmart. I'll be doing this project again with the crayon wrappers from the other set of crayons and this time I'll make sure I use clothespins from Walmart instead.
Pinterest Success #1 Complete
The next next Pinterest inspired project is an organizational idea.
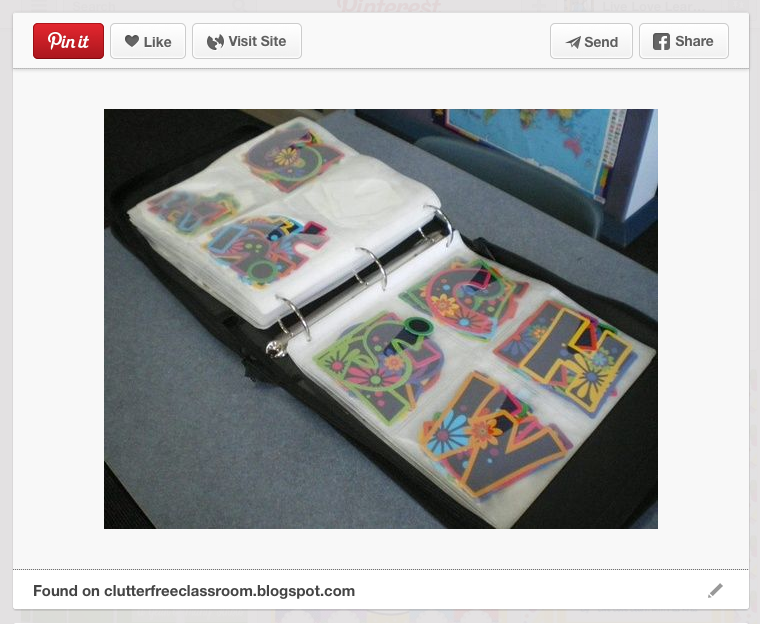
Here is the original pin from the Clutter-free Classroom blog. A blog I absolutely love for great organizational ideas. Click the pin to check it out!
I have been collecting bulletin board letters for several years but haven't really used them all that much.

It took so much time to go through each set and pick out the letters I wanted. And sometimes a set wouldn't have enough of the letters I needed, which I wouldn't realize until after I had spent 20 min punching out letters. Then when it was time to take that bulletin board down, the letters would end up in a ziplock bag because I didn't know what else to do with them. I knew I needed a better way to organize my letters I just couldn't think of one. Until I saw this pin on Pinterest. Score!!
First, I bought this cd case from Amazon. Click the picture to take you to the link.

Photo Source - Amazon
I looked a several cd cases and even considered buying the sleeves and binder separate. But in the end I went with this one. I'll explain why later on.
So first thing I had to do was go through each of my bulletin board letter sets and punch out all the letters. This took awhile.

Some of the sets were easier to punch out than others. These round letters were a dream to punch out. Note to self...buy more round letters in the future.
After I punched the letters out, I put them in piles by letter. Then I put the letters into the cd sleeves.


The other sets didn't take nearly that long. In fact, those 3" letters took longer than all the other sets combined.
Now for the finished product!

I need to do something to the front of this case to jazz it up a little. Not sure yet what I want to do though.

One of the reasons I went with this case as opposed to a binder with insertable sleeves was the zipper. This zipper will keep all my letters nice and tucked away, even if I drop the case. (I picked up the case to move it from my bedroom to the living room, not realizing it wasn't zipped, and ended up flinging letters out the top. I will always remember to zip the zipper from now on)
This is my new set of chevron letters. Love 'em!


I love how nice and neat they look!


Here are those itty bitty ones. They are cute, but I'm glad that part is over.


I love these Candyland themed letters!


I tucked the cards that came with each set into the back of the case.

These were all the letter sets I put into my case. (I took one set out that I had included in the first picture. I decided I didn't really like them, so I'll give them to one of my teammates instead.)
So all in all, this was a pretty time consuming project. But I am so glad that my bulletin board letters are neat, organized, and all in one place. Now when I am putting up a bulletin board, I will now exactly where all my letters are, I will quickly be able to see if I have enough of each letter for the project, and when its time for the bulletin board to come back down, the letters will already have a home so they won't end up at the bottom of a ziplock back. This will make putting up and taking down bulletin boards so much easier!
Pinterest Success #2 Complete
Stayed tuned, more completed projects coming soon!
I am SO happy I stumbled upon this post. One of the things on my summer to-do list is to organize my bulletin board letters. Ofcourse, I have the same pin on my Pinterest board, but I have been trying to find a suitable CD case for weeks!! Thanks so much for posting the one that you bought, now that it has someone's seal of approval, it may be the winner!!
ReplyDeleteGina
Miss Peluso's Kindergarten
I also saw the Pinterest pic with the crayon paper clothespins and I immediately thought it would be too time consuming and probably not work. So thanks for testing it out and giving your tips. I think I will give it a try this summer!
ReplyDeleteKay @ Sommer Pride
I {heart} you for sharing about organizing your bulletin board letters. I need to do that too! I might need to go buy some more so I can organize those before I can get to the ones at school.:)
ReplyDeleteI am happy to be your newest follower. Hop over and visit if you get the chance.
Heather
Heather's Heart