Sunday, October 12, 2014

Classroom Tour 2014

I've been meaning to do this post for like forever!  

But of course, time got away from me.
 

I totally agree with this statement!  Like most OCD teachers, I feel so much better if my classroom is neat, organized, clutter-free, and of course cute.  I mean, as teachers we definitely spend more waking hours in our classroom than we do at home.  So it might as well look and feel the way you want.

At the end of every school year, we have to pack everything up and get it off the floor so that our floors can be waxed.  I also have an entire wall that is made up of windows, so I try to cover every bulletin board in my classroom to minimize the fading that inevitably happens.

So here is what my room looked like when I left for the summer.


When I'm allowed back in, usually the middle of July, I always think that it will take no time at all to put back together.  I'll just put everything back where it was, right?

And that would have been super easy.  But I decided my room was due for a major overhaul.  

So after spending WAY too much time in this classroom, things are still not exactly how I want them.  Such is life.  My classroom is and always will be a work in progress. 

Welcome to my classroom...
 
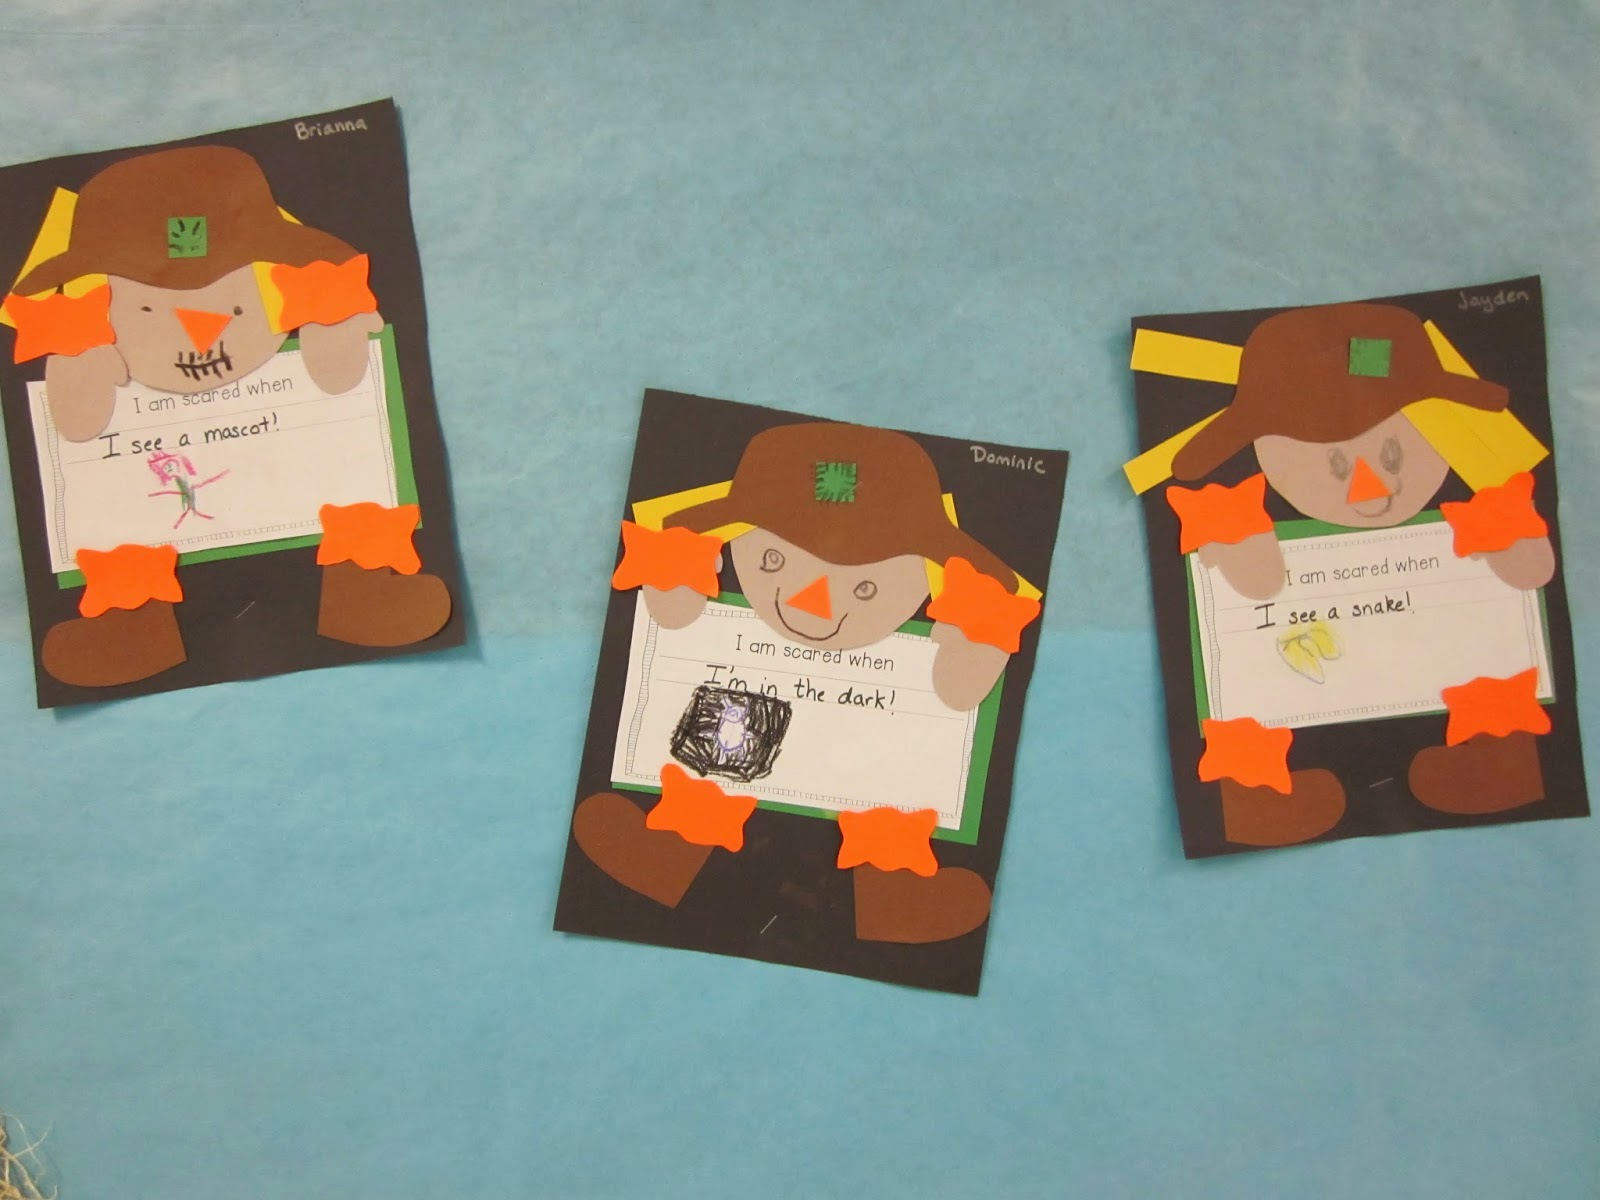
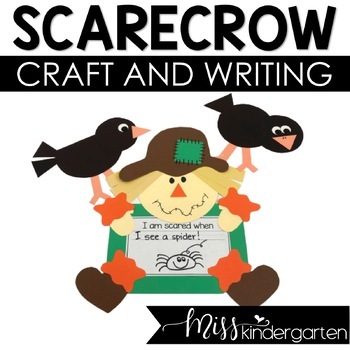
 Let's start with the bulletin boards in the hallway outside my classroom.  I usually display some form of seasonal work on this bulletin board and only change it out once a month.  For September I used this super cute scarecrow craft from Miss Kindergarten.

My star student board!  
Each week I display a new student.  I send home little papers several weeks in advance asking for responses to the questions and pictures.  I have at least 3 students ready to go at all times just in case someone doesn't turn one in.  This way I can skip the one that doesn't turn in their responses and move on to the next student.  I will then display the skipped student whenever they finally send in their responses and pictures.

I display student work on these clotheslines outside on the wall as well.  I change the work out weekly.  My school follows PBIS so the pink things on some of the pages are principal incentive bucks that she puts on the best papers.  You can also see where my students hang their backpacks.

My little cart outside my door.  
This cart used to have a sign-out sheet for students who were picked up before nap.  My county used to allow kindergarten students to be signed-out at the classroom at 2pm if the parents chose for their child not to take a nap.  The students who rode buses, went to SAC, or whose parents couldn't come pick them up, would take a nap and then be released at 2:45.  That is no longer allowed, all students must stay until 2:45, but I still use the cart to display my monthly Subway Art and to use for occasional sign-ins or sign-outs during parties. 

I also love displaying my crayon wreath made for me by an awesome parent 3 years ago!

I love this "We Love Kindergarten" banner from Babbling Abby's Crazy for Kinders Unit.
I sent one pennant home with each child at the very beginning of school for them to decorate at home with their parents.

If you walk into my room and turn right, this is what you'll see.  I love my focus board.  I revamped all of my bulletin boards this summer and this is one of my favorite new additions.  I love being able to display fun anchor charts that show parents, students, and my administrators what we are learning about.  Having everything hanging in one place also makes it really easy to review and remind students what we are learning about.  The little table in front is where my fabulous document camera lives, as well as my remotes for my Promethean board, document camera, and DVD player.

I used some medium sized clothespins from Hobby Lobby and they work perfectly.  Big enough to hold up my charts, but not too heavy for my ribbons.  To hang up the ribbons I just tucked the ends of the ribbons under the border and stapled.  So far they have held up very well.

This little shelf is another new addition to my room this year.  It came from Walmart and was pretty easy to put together.  I wanted a little station beside my document camera.

The baskets on top have everything I might need when using my document camera.  I got tired of getting up to go get a crayon or my stapler last year. So I bought extras of everything this year so that they are all within reach.
Love it!

I also keep my word wall cards tucked in the corner so that I know exactly where they are at all times and can access them easily. 

This is how everything looks on my little shelf. 

I've ventured into the word of interactive journals this year and love it!

I've been creating my own prompts for my math journals, but for my Phonics journals I've been using Cara Carroll's Interactive Alphabet Notebook.

My kids love them!  We do 1-2 alphabet activities per day for the letter of the week.  It just takes 2-3 min.

On the wall above my little shelf is my transportation chart.  I love this little pennant banner.  I just wish I would've used smaller clothespins because so many of my kids are car riders.  I think the medium sized clothespins I use on my focus board would work perfect.  But I mod-podged a zillion clothespins this summer and I'm just too lazy to mod-podge anymore right now.  So these clothespins will just have to work for now.

Here's the smaller clothespins.  
There are actually ones even smaller than this.  They are tiny and cute!

On either side of my door are my filing cabinets.  
My little communication station (post coming soon) and a fun Halloween painting sit up on top of this one.

The other filing cabinet is where our nametags hang out.  My kids wear nametags to lunch and encore for the first 9 weeks of school.  This gives the encore teachers and lunchroom assistants time to learn their names.

This is actually just a plain medium sized pocket chart, hung upside down.  
This makes it super easy for my students to get their own nametags before we go to encore and then hang them back up when we come back from lunch.

We are currently on fall break, so I sent all the nametags home before we left school last Friday.


 I have some allergies in my room this year, so I printed the little no milk and no nuts symbols on sticker paper and stuck them onto the nametags.  This helped remind the lunch assistants about the allergies.

Here is a view of the front of my classroom.  You can see my Promethean board, listening center, and puzzle center.

There is a reason have material around my Promethean board.  When the maintenance workers installed my board during Christmas break in 2008, they tore the whiteboard down and installed the board in its place.  I thought they were going to install the board over the whiteboard.  So imagine my shock when I walk into my classroom and behind the left side of the Promethean board are wood planks and behind the right side of the board are concrete slabs.  I could not handle looking at that all day.  So I stapled, the material on the left side to the wooden planks and hot glued the material on the right side to the concrete slabs.  That material has now been there for almost 6 years and is still holding strong!

I like it because it kind of looks like a frame around the board.

My writing center!  Love it.  
The picture cards come from DeeDee Will's Writing Work Stations for October.  I used the tiny clothespin to attach the picture cards to the ribbons.

 I love my counter space!  
This counter holds the tubs for our BEE Books, our mailboxes, my fridge and microwave, and all of my construction paper. 
I also like to decorate my ugly blinds with some seasonal posters.

 My classroom was build in the 1920's and the paint around my windows is always peeling.  I got tired of looking at it and having to clean up the paint flakes (probably has lead in it) so I hot glued a cute chevron board to cover it up.  I just wish I would have thought of that 9 years ago when I moved into this classroom.

 I love these candy corn sun catchers.  I especially love the fall leaves on the ground in the background.

I got the idea from Maria Manore at Kinder-craze.  She has her students do cute seasonal sun catchers and displays them on her windows.  Well I've got tons of window space!  So this summer I came up with a different window decoration for each month of the school year.


 I now have a ridiculous amount of clip art, so I whipped up these cute labels last summer so that the kids could get supplies when they needed them.


 I love my Boo Boo Box!

My kids know exactly where to go when they need their inhaler or a band-aid, with permission and supervision of course.

We also have an Epi-pen but that stays at the front of the room so we can grab it on the way to lunch.

 Here we have my small group table, bathrooms, and behavior charts.

 Behind my desk.

Snack supplies (more clip art fun), teacher binders, teacher manuals, assessment tub.

 This is the "I Love Lakeshore" part of my classroom.  

Not really, but I do love Lakeshore.

My ridiculous amount of Mailbox books, extra field trip t-shirts, End of the Year files, and extra stuff.

 Lesson plans stay on the end of the blue cubbies.  I never really look at them but they have to be "displayed."

Click here for my free lesson plan template.  It's actually color, but when I get lazy I just print it on the school printer in black and white.

 The table beside my desk has my weekly organizer drawers, Mailbox books I use most often, and binders for our End of the Year books.

 I spray painted these 3-drawer organizers purple, then mod-podged the organizer labels on the front of the drawers.


 These tubs contain my seasonal decor.  

In other words it looks like Hobby Lobby exploded inside each tub.

 More clip art fun!


 My calendar mtg board.  
This entire board is magnetic.  So everything, even the material and border, is being held up by tons of little magnets.

I also do calendar work on the Promethean board, but I wanted calendar info that could stay up all day so the kids could refer back to it if they needed too.

I always keep each day's work drawer beside my rocking chair.  This way all the books and materials I need for the day are close by and ready to go.

 Blocks centers, schedule cards, center cards.


 I love these magnetic baskets to hold my extra center and schedule cards.

 My favorite Word Wall and reading center ever!

 View of the room from the door.


View from the back!

Hope you enjoyed this tour of my classroom! 

Wednesday, September 10, 2014

Behavior Tracking

Let's talk about behavior!


 I've wanted to do a post on this topic for quite awhile.  And of course, the week I finally sit down and type it, we just had a "super moon/harvest moon." 

I never believed in the power of a full moon... until I became a teacher.  Now, I'm a believer.  Something about the full moon makes my kids go WILD!!

http://media-cache-ak0.pinimg.com/236x/63/5c/e4/635ce4af1fe3b1795a2d5ef9b49f2ebc.jpg 

 Perfect time to talk about behavior tracking, right?

Like most of the teaching world, I switched my behavior chart from cards to clips several years ago.


You can see my behavior card chart in the background of this picture from about 4 years ago.


I switched about 3 years ago to this clip chart.  I remember I started seeing clip charts everywhere on Pinterest and hearing everyone talking about them.  So of course I had to check it out.

One of the things I loved about the clip chart was that students could move up and down based on good or poor choices.  If a student made a poor choice, they could have a chance to move the clip back up by making good choices.  

I also loved that it rewarded the students who continually make good choices throughout the day.  Whereas with the card chart, the goal was to stay on green, so as long as you weren't "bad" you stayed on green and you were fine.  

The above clip chart was one that I made myself, and I was soo proud of it! 

At the time,  I was obsessed with Poppin Patterns by Creative Teaching Press.  So I bought a bunch of Poppin Patterns borders and cut and glued them around card stock.  Laminated them and strung the cards together with wrapping ribbon.  This chart held up for 2 years and was retired this year.

This is the chart I use now.


I actually have 2 of these behavior charts, this one is on the boys bathroom door.


This one is on the girls bathroom door.

Yes, I am blessed to have 2 bathrooms in my room.  Hallelujah!

I chose to use 2 different charts so that my students could easily find their clips and because I just liked the way it looked.

This behavior chart is available in my TpT store, here.


I love this chevron chart!

All students start on green, "Ready to Learn," each day.  Their choices throughout the day decide if they should move their clips up or down.


Like everything else in my room, my behavior clips are bright and colorful.

I used sparkle cardstock from Hobby Lobby to decorate these clips.  I just trimmed down cardstock to fit each clip and then used Mod-Podge to adhere the cardstock to the clip.  

I actually did the Mod-Podging this summer while I was watching a movie.  Multi-tasking people!

I do not put my students names on the outside of the clip.  If your class is like mine, you have some nosy parents.  I didn't like that anytime someone walked into my room, they could see exactly how everyone was behaving that day.  Not their business!  This was really bad at parties.  When I used to use my card chart, I would turn all the cards back to green before the parents came in because I didn't want them to know about other children's behavior.

So I put each student's name on the back of the clip and use a sticker on the front to identify each student instead.


I print the names onto a printable file label, trim it down, stick it on the back of the clip, and then paint a thin coat of Mod-Podge on top so that I don't have to worry about the sticker coming off.

At the beginning of the year, I make a baggy of stickers for the boys and one for the girls.  I make sure that there are only 2 of each sticker.  A student chooses which sticker they want to go on the front of their clip, I put a thin coat of Mod-Podge on top of the sticker so that it doesn't come off.  Then I put the coordinating sticker onto my sticker management chart.


I use this chart all the time.  It helps me to quickly identify whose clip belongs to who, without having to look on the back of each one.  I especially use this chart at the beginning of the year when they can't always seem to remember which sticker is theirs.  I have had more than one case of a student moving the wrong clip up or down.  So I usually do a quick check on my chart as clip moving is going on so that I can catch any mistakes.

And now, because I put the names are on the back of the clips, I don't have to worry about moving everything back to green when we have a parent volunteer or a party.   

Throughout the day, I keep track of who moves their clip down and why.

 
This is just a simple one-subject notebook from Walmart.  I write down the date, time, child, and description.  I started writing this down because if I don't, I will forget.  Then at the end of the day when I would be filling out my behavior charts, I would forget why they moved their clip down.  I would totally try to cover up the fact that I forgot by asking the child in question why they moved their clip down, in a stern voice, and they would usually tell me so that I could write it down. 

Now I just keep this notebook on top of my filing cabinet throughout the day, and when I tell a student to move a clip down, I immediately go and write my notes.  This is also super handy when I'm having a conference with a parent, because I can just whip it out.

At the end of the day, I fill out a behavior chart in my students' take-home folders.  


The above chart is the one that I used for several years, my kindergarten team still use it.  The rules are numbered 1-Be Respectful, 2-Be Responsible, 3-Be Safe.  If a child stays on green or above, I would put a sticker on the box for that day.  If a student moved their clip down, I would circle the number code for the rule they broke and then write a description in the box.  If the students was on yellow, I circled 1 for 1 strike, and so on.

This behavior chart and the sticker management page are both included in my Behavior Clip Chart file.

It would have been much easier to continue using this behavior chart.  But who wants things to be easy!  No really, I got annoyed that I had to switch the chart out every 3 weeks and I wanted my students to be more involved in the behavior chart process, rather than just watching me while I filled it out for them.

So out of necessity, the Behavior Management Binder and new behavior charts were created.


I made up a simple little binder with everything I needed to keep track of my kids' behavior.


I tucked a cheat sheet in the inside cover just in case an assistant or substitute has to manage my behavior charts.  This page has the colors and phrases from behavior chart on the left side, and the behavior codes on the right side.  Yes, I added a lot more behavior codes.  This way I don't have to write a description of the behavior, the codes speak for me and let the parents know exactly what happened.

In the event of a major offense, I would contact the parent.


I also keep a sheet of stickers tucked in the pocket because I reward the students who end the day on blue, pink, or purple with a sticker on their sticker chart. 

I keep a pencil pouch with all the colors of crayons I need (they match the behavior chart) and a sharpie.  

At the end of the day, I set my binder open in front of me, I bring my students take-home folders back to my reading table, and start calling students to come fill out their behavior charts.

My small group/reading table is in the back of the room, right in front of the bathrooms (behavior charts are on the bathroom doors).  I set out 2 folders at a time, call those students back to check which color their clip is on, and then color in their behavior chart using the correct color.  (I usually double check to make sure they told me the right color by glancing at my sticker management page)

 
I made one of these charts for each month, so now I only have to switch them out each month as opposed to every 3 weeks.  The first school day of each month, the students color in the behavior chart on the side of the page.  Then each day they color in the correct square on the calendar with the color their clip is on at the end of the day.

This chart is editable so that you can type in the dates on the calendar.  As you can tell, I forgot to do that before I had the August pages copied.  So I just didn't worry about it for August.  But when I started getting my September calendar ready, I made sure to type the dates in the boxes before I printed and copied.

If a student's clip ends the day on yellow, orange, or red, I use my sharpie to write a behavior code in the box and then have the student color over my code.  If a student is absent, I write an A in the box when they come back.

The first few times I used my new behavior chart, I would have my students get their crayon basket from their desk and bring it back to me.  I quickly realized that this was not efficient.

Half of the students would come sit down at my table, but would forget to bring their crayons.  When they were finished, they would put their folder away, and I would have to remind them to come back and get their crayon basket so that they could put it away.  

And have you ever noticed how many different shades of orange there are?  My kids would grab a pink crayon and start coloring, then realize that it looked more red than pink.  Or they would grab an orange crayon that looked more yellow than orange when they colored.  This was driving me crazy because the colors on their charts weren't consistent.  And when parents are specifically looking at the color on the behavior chart, the colors need to be consistent.

So I grabbed some extra crayons, 2 of each color, put them in a basket, and keep them beside my behavior management binder.


Now when I call my students back to the table to complete their behavior chart, they don't have to worry about bringing their crayons.  They just use mine.  And this way the colors are also consistent.  Win-win situation.


While my students are coloring in their behavior charts, I am coloring in mine as well.  I created a page to track weekly behavior.  My chart reflects each student's chart.  If I wrote a behavior code on a student's chart, I write the same behavior code on my chart.  I then color the box the same color they colored their behavior chart.  I also write A for absence on my chart.  I have been using this binder for about a month and I love this weekly page so that I can quickly track my behavior and see patterns. 

I also love this weekly chart because if a child's behavior chart goes missing, that so never happens right?, I didn't lose all the behavior data.


The first time we colored in the behavior chart, it took a little longer because I had to tell them which color to color each box.  When we did our September page, they just looked at the behavior chart behind me and colored them all in on their own.


One of my favorite things about this new chart is that the kids take ownership for their behavior, good or bad, because they are coloring in their own chart.  As opposed to me just writing on it for them.  I love that they are responsible for filling it in.


The behavior charts stay tucked in the front pocket of my student's take-home folder (actually it's a binder) with this little reminder to the parents not to take it out.


I keep extra monthly behavior charts in a plastic sleeve behind the weekly tracking pages.  Just in case a behavior chart does go missing.


I also keep my original of the weekly tracking page and extra stickers in the next plastic sleeve.

I hate having to get up and go find something when I'm in the middle of a task.  I want everything within reach.  So I keep everything I need, right inside my binder.


I wanted to reward my kids who earned the right to move their clip up to blue, pink, or purple.  So I created these cute little behavior charts and let my students pick which color chart they wanted.  While the students are coloring their behavior charts, I put stickers on their charts.  

Blue = 1 sticker
Pink = 2 stickers
Purple = 3 stickers

When a student fills their chart, there are 30 boxes, I will them pick out a treat from the treasure box and they get a new sticker chart.

I love that no one, except me, can really tell which students are the best behaved.  A parent coming in would never be able to tell whether a student has only a few stickers because they have trouble behaving or if they just started a new sticker chart.

As you can tell I've had some nosy parents in the past, so I work hard to try to ensure each student's privacy when it comes to their behavior at school.  I tell my parents at the beginning of the year that their child's behavior is no ones business except mine, theirs, and the child's.


My sticker management chart and behavior binder fit nicely into this tub from Big Lots, and the crayons stay right in front.  This little shelf is between my bathrooms and right behind my reading table.  Like I said, I want everything within reach.

This behavior management binder is available on my TpT store in both editable and non-editable versions.  The editable version can be modified to go with any clip chart system.

You can check it out here if you're interested.


How do you track behavior in your classroom?

I am always looking for new ideas!

Thursday, September 4, 2014

Is It Fall Yet?

I love Fall!

I love the cool mornings, leaves changing color, pumpkins, corn mazes, chili, wearing jeans and sweaters after a summer of being hot and sticky; I just the whole atmosphere in general. 

Who cares if Fall is technically still a few weeks away.  I decided I was ready to do a little Fall activity and decorate my September bulletin board.  So this week in Art Mart, my kids are making the cutest scarecrow writing craftivity and then I'm putting them up on my bulletin board when they are finished. 

So we are adding just a few each day, but I have found that this is a good way not to stress over a bulletin board.  Just do a little at a time.


Normally I choose independent art activities for my Art Mart.  Things that they don't need my help with, they can just look at an example and go.  But I wanted them to do a really good job on these, and they were going on display, so I helped them step-by-step.

The first thing we did was I wrote down their answer to finish this sentence "I am scared when."  Then I handed them their pieces and showed them where to glue.  I also had made an example for them to look at.  I am a visual learner and like to have examples.


So much Fall fun!


They turned out so cute!


This one seriously cracks me up!

Her parents warned me during our conference a few weeks ago that if she sees anyone in a costume she will run and hide.  They said they have to circle around Chik-fil-a to make sure the person in the the cow costume isn't walking around inside before they go in.  They also told me that she saw our local college mascot at a basketball game, he was all the way across the basketball court, but she hid behind the bleachers and kept asking her parents if they thought the mascot saw her.

Bless her!  No trips to Disney World in their future.


As we walk by our bulletin board on our way into or out of the classroom, all my kids turn to check out the scarecrows.  And some ask me every time, when it will be their turn to make one.

If you want to check out this awesome Fall craftivity by Miss Kindergarten, click here.

 http://www.teacherspayteachers.com/Product/Scarecrow-Craft-and-Writing-Templates-368375

I made the pieces of my scarecrow just a tad smaller than her examples so that I could fit the whole thing onto a sheet of construction paper that had been trimmed down to 8.5 x 11.  That way I can easily slip it into a plastic sleeve and into our End of the Year Books.  

Always gotta think ahead!

Tuesday, September 2, 2014

All About Our Class

One of the most special parts of the beginning of a new school year is getting to know and love my new kids.

So what better way to get to know your students than with a fun book that's all about them!

Ever since I started teaching, I have always had a student of the week each week.  I send home a little paper with questions for them to answer and ask that they send in a few pictures.

Then I type up their responses and put them and the pictures up on my hallway bulletin board for the week.


The kids love it and so do I.  They love walking past each time we come and go from our classroom.

But I wanted something that would last a little longer than just a week...

So I created a book for my class to make that would last all year!


The front cover is of course my name and a class photo.
Instead of going to CVS and getting a class photo developed, I just inserted the photo onto the page (the editable version is in PowerPoint so I used that one to insert my picture and type my name at the top) and printed. So much easier.


I decided to send the pages home for the parents and students to complete together, a little family involvement never hurt anyone.  But you could help the students complete their page in class or even let older students complete theirs on their own.


This little guy obviously had a "little" help from his mama.


I loved seeing all the sweet pictures that my kids had picked out for their page and learning more about each one.


Some used baby pictures and others used more recent ones.  The above picture is from the very first half day of kindergarten where we read The Kissing Hand and then the parents painted their child's hand.


I purposely made the response spaces a little bigger and more appropriate for drawing pictures, because that is what I wanted/expected my kindergarten kids to do.  I also added little clip art to help them remember what each section for for.  There is a girl version with girl clip art and a boy version with boy clip art.


And of course I had to do a page for me!

Don't laugh at my drawing.  Poor Clifford looks a little funny.  Drawing is definitely not a talent of mine.


I used an autograph page as our back cover.  I made the document so that you can add or delete lines, but I purposely left a few extra blank lines in case we have any new friends join us throughout the year.


One of the biggest reasons I wanted to make a book about our class, was so that it could go in our Book Nook for the rest of the year.  I wanted the kids to have a book that they could pull out anytime they were in Book Nook and enjoy looking at the pictures and "reading" about their friends.


It has quickly become one of the most popular books in Book Nook.  My kids always love finding their face in our group picture, looking through the pages of their friends, finding and enjoying their own page, and finding names on the back cover.

This was a success!

At the end of the year, my plan is to pull out each child's page, put it in their End of Year Book, and then keep the cover and autograph page for myself.  We'll do another autograph page later for the back cover of the End of Year Books.

If you want to check this class book out for your own class click here or on the picture below.


The book comes in an editable version and an uneditable version.  

Enjoy!