Monday, June 30, 2014

Meet Me Monday!

Today I'm linking up with The Teaching Tribune for their Monday Meet Me.

http://www.theteachingtribune.com/2014/06/monday-meet-up-5.html

Today's assignment is to list 3 things we are thankful for...


So what are 3 things you're thankful for today?

Click the link at the top to read some more thankful thoughts.

Wednesday, June 25, 2014

Pinterest Success!

I love finding great ideas on Pinterest.  But what's even better is actually taking the time to do those projects I've pinned.  Today I have 2 Pinterest success stories!

The first Pinterest inspired craft were these super cute crayon clothespins.  

This is the original pin.  There was not link from the picture.  So I just went off of what I saw.


I thought these crayon clothespins would be super cute to display my students' work in the hallway on my already existing clothesline.

So first I bought 2 boxes of crayons.  I love Crayola!

Then I had to figure out how to get the paper off the crayons without tearing it.  This was a little more complicated.  So when in doubt...Google it.

One suggestion said to use a razor blade, so that's what I did.

It took me a little trial and error to get it right, but finally I got it going.  The glue they use to keep the paper on the crayon is super strong.  When I was finished getting all the wrappers off, I noticed that the papers were still very much curled and would therefore be difficult to mod podge.  So they spent the night under a heavy book to help flatten them out.  Thanks Harry Potter!

Next, I trimmed each wrapper down to fit the width of my clips.  Then I used a sponge brush to spread some mod podge onto the clothespins and then placed the crayon wrapper on top.  I held the crayon wrapper down on each clothespin for a few seconds because some were still trying to curl.

By the time I finished the last clip, the first were already dry enough for their top coat.  So I went down the row again and spread mod podge onto the top and sides of each clothespin.  I let them dry overnight.

I absolutely love how these turned out!  You can't tell from my picture, do to my sub-par photography skills, but the colors are very bright and pretty.  The only thing that bothers me about the finished product is that my clothespins were longer than the crayon wrappers.  Obviously I can't make the wrappers longer, but I bought these clothespins at Hobby Lobby and noticed they were a bit longer and skinnier than ones from Walmart.  I'll be doing this project again with the crayon wrappers from the other set of crayons and this time I'll make sure I use clothespins from Walmart instead.

Pinterest Success #1 Complete

The next next Pinterest inspired project is an organizational idea.

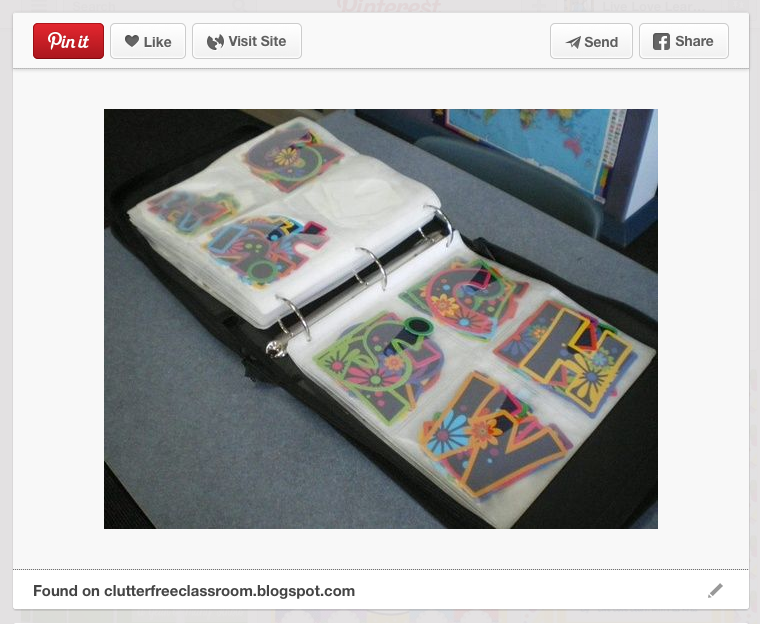
Here is the original pin from the Clutter-free Classroom blog.  A blog I absolutely love for great organizational ideas.  Click the pin to check it out!

http://clutterfreeclassroom.blogspot.com/2012/09/storing-bulletin-board-letters-coffee.html

I have been collecting bulletin board letters for several years but haven't really used them all that much.  
 
It took so much time to go through each set and pick out the letters I wanted.  And sometimes a set wouldn't have enough of the letters I needed, which I wouldn't realize until after I had spent 20 min punching out letters.  Then when it was time to take that bulletin board down, the letters would end up in a ziplock bag because I didn't know what else to do with them.  I knew I needed a better way to organize my letters I just couldn't think of one.  Until I saw this pin on Pinterest.  Score!!

First, I bought this cd case from Amazon.  Click the picture to take you to the link.
http://www.amazon.com/Case-Logic-KSW-32-Capacity-Prosleeve/dp/B00005ATMI/ref=sr_1_8?ie=UTF8&qid=1403748939&sr=8-8&keywords=cd+case
Photo Source - Amazon

I looked a several cd cases and even considered buying the sleeves and binder separate.  But in the end I went with this one.  I'll explain why later on.

So first thing I had to do was go through each of my bulletin board letter sets and punch out all the letters.  This took awhile.

Some of the sets were easier to punch out than others.  These round letters were a dream to punch out.  Note to self...buy more round letters in the future.

After I punched the letters out, I put them in piles by letter.  Then I put the letters into the cd sleeves.
I used 3 pages (front and back) and 1 side of a page for each set of letters.  After the alphabet, the last 2 sleeves on the page were dedicated to punctuation and numbers.

These 3" letters are super cute with their stripes and polka dots.  But don't let them fool you, they were a total pain to punch out.  They were so small and there were a ton of them.  724 (including punctuation and numbers) to be exact.  They took me 3 hours...


The other sets didn't take nearly that long.  In fact, those 3" letters took longer than all the other sets combined.  

Now for the finished product!
I need to do something to the front of this case to jazz it up a little.  Not sure yet what I want to do though.


One of the reasons I went with this case as opposed to a binder with insertable sleeves was the zipper.  This zipper will keep all my letters nice and tucked away, even if I drop the case.  (I picked up the case to move it from my bedroom to the living room, not realizing it wasn't zipped, and ended up flinging letters out the top.  I will always remember to zip the zipper from now on)

 This is my new set of chevron letters.  Love 'em!


I love how nice and neat they look!

The letters on the right were new.  They are the Fresh Sorbet EZ Letters from Carson Dellosa.  I love the different patterns.  They were cheaper than other sets, probably because they didn't come with as many letters in the pack, but they were already punched out.  Hallelujah!  All I had to do was alphabetize them.  I will be buying another set.

Here are those itty bitty ones.  They are cute, but I'm glad that part is over.
 
I love these Candyland themed letters!

I even have enough extra space left over for 2 more complete sets of letters.  Although I need more bulletin board letters like I need a hold in my head.  Case Logic also sells more pages of sleeves so you can always add more if you need to.

I tucked the cards that came with each set into the back of the case.

These were all the letter sets I put into my case.  (I took one set out that I had included in the first picture. I decided I didn't really like them, so I'll give them to one of my teammates instead.)

So all in all, this was a pretty time consuming project.  But I am so glad that my bulletin board letters are neat, organized, and all in one place.  Now when I am putting up a bulletin board, I will now exactly where all my letters are, I will quickly be able to see if I have enough of each letter for the project, and when its time for the bulletin board to come back down, the letters will already have a home so they won't end up at the bottom of a ziplock back.  This will make putting up and taking down bulletin boards so much easier!

Pinterest Success #2 Complete

Stayed tuned, more completed projects coming soon!

Sunday, June 22, 2014

Getting Ready for Next Year!

Plastic tub heaven!  


Thanks to a nice little tip on Instagram, I have stocked up on plastic tubs, baskets, bins, you name it, for next year!  (and probably the next five years as well)

Side note: I started an Instagram account a little over a month ago, but didn't really put much time into learning how to use.  So of course I didn't use it.  Then I randomly decided to give it ago.  I am now having way too much fun posting pictures of random things.

If you're not following me, you need to.

Back to plastic tub heaven. This picture on Instagram showed nice neat shelves with plastic tubs in every variety and color you could imagine.  So I knew I had to scoot on over to the Dollar Tree.  Unfortunately, most of the teachers in my county got there before I did, so while I did get some new storage tubs, the selection was not so great.

I decided to broaden my search for Dollar Tree gold. 

I drive to Knoxville every week for ice skating lessons.  Yes, I know it's a little crazy but I love ice skating.  Last night I decided to look up the Dollar Tree stores in the Knoxville area and hello there were a ton!  So after my skating lesson today, when I was nice and sweaty and stinky, I headed on over to the closest of the four stores I had set my sights on.  (I really wasn't planning on going to all four stores, I just wanted some back ups in case I couldn't find what I wanted)

The first store was well stocked and I walked out of there with a basket full.  I bought pretty much everything I had wanted, but of course I couldn't stop there.  So I decided I would go to the next closest Dollar Tree and see if they had anything else, just in case.

The next store wasn't quite as stocked as the first, but I did walk out of there with a nice armful of baskets I can use for centers.  So all in all, my side trip was a success! 

Here is what I bought...

I'm not quite sure what I want to do with this first set of tubs but I'm sure I'll think of something.  When it comes to buying storage containers, especially inexpensive ones, my motto is buy now, figure out a use later.  I can never have enough storage tubs.

This next set of baskets was actually the entire reason for the Dollar Tree side trip in Knoxville.  I wanted new tubs for my floor puzzles and books.  I use little 12x12 cubbies from Kmart for my centers and these bright tubs will fit so nicely in each little section.  Plus the colors make me so happy and now I won't have to spray paint my current set of puzzle and book tubs.  Time saver!

I thought these baskets would make a nice little holder for the magazines in my reading center. 

This little tub is actually from JoAnn's.  One of my projects for this summer is to make a Boo Boo Box.  A boo boo box will just be a place where I can keep bandaids, wet wipes, my thermometer, etc all together in one place.  My goal is to have this tub somewhere accessible to myself and my kids in case we need it, and have it be portable so that I can take it outside to recess with us.  I thought this tub fit my vision nicely.  It has a lid, an easy to grip handle, and it's not too big or too small to fit the items I need.

I picked up a few little containers with lockable lids for my small puzzles.  I have several small puzzles, but I'm not going to have them all out at once.  So I figured I could put 3 out at a time and just keep rotating my small puzzles in and out of these little containers.

These last containers are the ones I originally bought, from the Dollar Tree in my town.  These are the perfect size to hold smaller items like markers, crayons, glue sticks, glue bottles, or anything else I need to keep together.  I probably didn't need all of these, but some might break so I'll have back ups.


While I was leaving the last Dollar Tree, I looked across the parking lot and spied a JoAnn fabric store.  I have never been in one but I'd heard good things about them.  So I thought I'd take a quick trip over there and see if they had anything good... A quick trip turned into an hour.

I love JoAnns.  I enjoyed meandering up and down each isle.  I ended up buying some material for my bulletin boards, material for a small table that holds my document camera, some picture frames, and my boo boo box tub.

I'd say my little excursion around Knoxville was a success. 

We are still banned from our classrooms while the workers wax the floors, but I can't wait to get back in there and put these bright tubs to use!

Thursday, June 12, 2014

Summer Projects & Freebies

Yes, it is summer.  But who has time to relax?  This is when I have time to get everything done, stress free.

I have been a busy little bee.

Finding all these wonderful kindergarten blogs has been wonderful for my classroom, it's going to be cuter and more organized than ever next year, but bad for my bank account and time management skills.  Who needs sleep when you can stay up till 2am working on fun projects?

So what have I been doing?

First of all, I have a new love.  He came in the mail yesterday and I lovingly refer to him as Hot Stuff.

No, no, I didn't meet some rich awesomely handsome guy.  Hot Stuff is my new laminator and I think I'm in love. (Sorry for the horrible picture)  Why have I not heard about these laminators before?  Instead I have been at the mercy of the school laminator who I have a love hate relationship with.  Sometimes it works, sometimes it doesn't, sometimes it leaves wrinkles or peels apart, but most of the time, it's just plain broken.

This baby was only like $30 something at Amazon.  Yes, you have to buy the laminating pouches to go with it.  But it's worth it in my opinion.  I'm debating whether or not I want to bring this little baby to school or buy another one to leave at school.  Hmm...


I didn't think the laminating pouches were too pricey either.  But then I don't really have anything else to compare them too.  Oh and the laminating pouches make everything nice and sturdy.  Have I mentioned I'm in love?
Last picture, I promise.  For now... Let me look around the house and see what else needs to be laminated.

Okay, on to what I've really been doing.

I started selling items on TpT last July, on a whim, right before school started.  I decided right away that I was only going to put things on there that I personally wanted/needed for my own classroom.  That way if no one else wanted my creations it wouldn't be a big deal because at last I wanted them.  So I made a few things between July and September, then decided I was too busy and kind of forgot about making new things.  Instead I just bought them from everyone else on TpT.  (There are some really awesome center ideas out there)  Then in May of this year I decided that making things for TpT was actually fun, so I started creating again.  Then, I became an addict.

I am a clip art addict.  For me, the best part about starting any new project, is getting to shop around for the clip art I want to use.  I know, its a serious problem. Haha, not really.  But who knew clipart could be so much fun.  So then I wanted to make more and more things, just so that I could justify buying new clip art.  That totally makes sense right?

Anyways... I have been spent the last 3 weeks, my entire summer so far, making as many things as possible for my classroom next year, using all of my fun new clip art of course.  I've been creating new products as well as updating old ones.  An organized, colorful classroom makes me happy and clears up my mind so I can focus on more important things, like teaching!

So here are some new products in my TpT store.  Oh, did I mention that all of these are FREE!!  So get on over there and download your freebies.  They're too cute not too.  Just click the pictures to go to my TpT store and download.

http://www.teacherspayteachers.com/Product/Subway-Art-Rules-Posters-freebie-1265254

I don't know why I have become so obsessed with subway art.  I have always loved using a black background on a bulletin board because it makes all the colorful posters really stand out.  I think the black background subway art reminds me of that.  Either way, I'm a little obsessed.  I saw some really cute subway art rules posters on TpT, but my school follows PBIS, so we have 3 specific rules for our entire school.  These posters were actually made with my school's rules.  But they were too cute not to share.  I also made a white background version in case black isn't your thing.  You can print them on regular card stock or if your county has one of those awesome poster making machines, like mine does, you can blow these up to poster size.  We did and we're going to hang them in the kindergarten hallway.

http://www.teacherspayteachers.com/Product/Left-Right-Anchor-Charts-Freebie-1269023

Last week my kindergarten team and I met to plan out our reading and math units for the entire year.  Our first unit in math is position words.  I decided it was time to make some posters to go on my new Anchor Chart bulletin board. (I'll post pictures when I actually make it, right now we are banned from the school building until the floor waxing is finished)  First up for position words is definitely left and right.  My kids struggle with this every year.  So I decided to make some posters to help remind them which side is left and which is right.  There are actually 3 posters in this download.  2 full size posters, one for left and one for right, as well as 2 half size posters that you cut apart in case your bulletin board space is limited.  I decided I was going to make anchor charts this year as I needed them, so keep checking back to see if I've made any new ones.

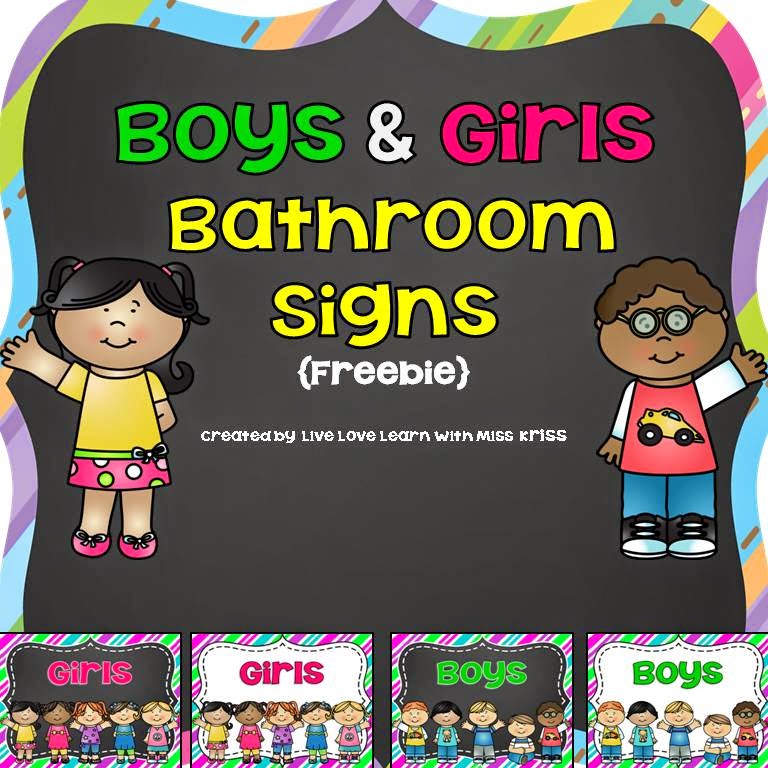
http://www.teacherspayteachers.com/Product/Boys-and-Girls-Bathroom-Signs-freebie-1271106

The next thing I made were signs to go on the girls and boys bathroom doors.  I have 2 bathrooms in my classroom, so I plan on hanging these on the doors.  And yes, there is a black background and white background version.  So you decide which ones you want to use.  I just love the clip art for this set.  I think the little kids look like cabbage patch kids, and since I am a child of the 80's, cabbage kids will always have a special place in my heart.  If you don't have bathrooms in your room, you could always post these on the bathroom doors in the hallway.

http://www.teacherspayteachers.com/Product/Birthday-Wishes-for-You-A-birthday-book-freebie-1274431

I actually posted this next freebie just this morning.  I love celebrating birthdays in my classroom.  I don't know why, I just love that each child gets their own special day.  I even celebrate the summer birthdays during April and May because it's just not fair to leave them out.  Can you tell I have a summer birthday and that's happened to me a time or two?  So back to the freebie.  This is a birthday book that you can make with your kids.  There are 2 colored covers (1 boy and 1 girl), 2 black & white covers (1 boy and 1 girl) so your birthday kiddo can color in their own cover, and 1 insert page.  Copy one insert page for each student in your room, except the birthday kid.  The other students, and the teacher if you want, will draw a picture to show what they want to give the birthday boy or girl if they had all the money in the world.  Then they fill in the sentence by writing what they would give, and sign their name at the bottom.  Next you compile all the pages into a book.  I've used binding combs and strung yarn through holes to keep the pages together in the book.  Either way works fine.  At the end of the day, the birthday kid gets to take their book home and share it with their family.  This has always been a huge hit with my kids.  They can't wait to take their book home.  I've also had many a parent tell me that their child will look through their birthday book over and over again.  So special.

http://www.teacherspayteachers.com/Product/Daily-Work-Organizer-Labels-freebie-1274029

The last freebie I'm going to share with you today are daily work drawer labels.  I use 2 Sterilite 3-Drawer units to organize my weekly classroom work.  I label each drawer with a day of the week and put all items needed for that day into the drawer.  I even put the work in the order that I'm going to use them.  This makes life so much easier.  All I do is put the next day's drawer beside my rocking chair before I leave each afternoon.  In the morning, whatever I need first is on top and ready to go.  This is also very helpful if you have an unexpected sick day.  You can just set out the drawer for the sub.

I decided my drawers were a little plain.  So I jazzed up the actual drawer frame with some awesome purple spray paint.  This was my first spray paint experience.  Other than the fact that it got all over me, it was so much fun.  So I've been making a list of all the things in my room that need a little color.

Then I printed the labels.  I made stripes and chevron so you can decide which ones you want to use.  And then I used Mod Podge to adhere the labels to my drawers.  I actually give step by step instructions on my drawer project in the download, and I included pictures.  The 6th label is blank and editable.  Which means all you need to do is click on the text box and type in your own label.  I give instructions on how to make your text match the rest of the days in my download.


They turned out so colorful and pretty, if I do say so myself.  Too bad the other set of drawers (Thursday, Friday, and Extras) are still at school.  I may have to sneak in tonight and get them.

So anyway.  That is what I have been up to.  I hope you enjoy these freebies as much as I do!